Default layout
The default layout is provided as a starting point for your configuration. This is the layout that is already loaded when you get a new keyboard. We advise you to start from it to learn the basic concepts, but you should quickly try experimenting with the configurator to create your personalized version that will serve you best. In this section we will guide you through the default layout.
Default layer (layer 0)
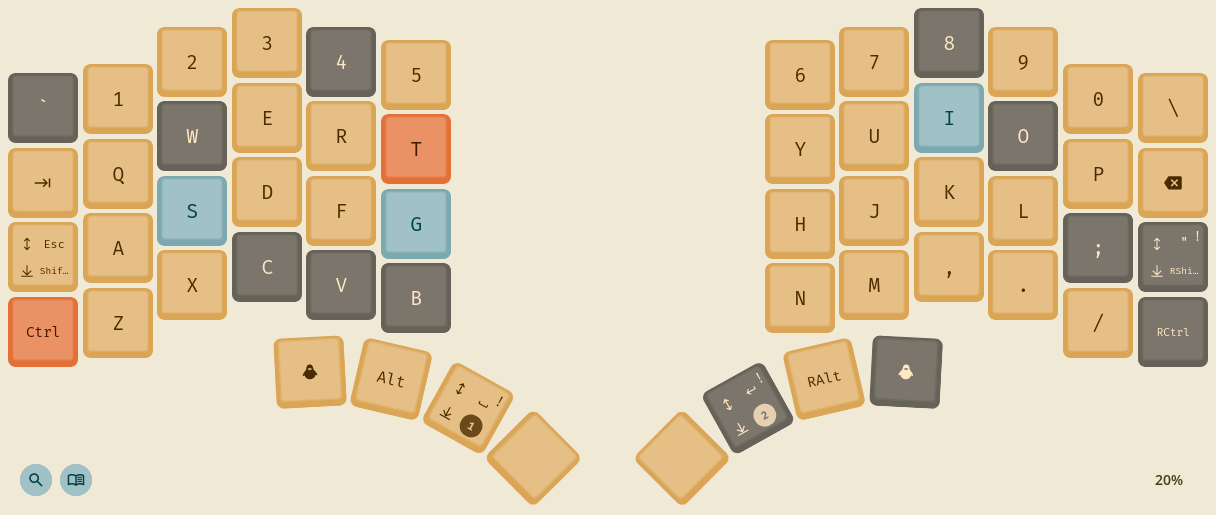
The default layer is the layer that is active when you haven’t switched to any other layer. Key layout on this layer should be familiar as it resembles “regular” keyboards with QWERTY layout, with letters and numbers in expected positions.
Shift
Shift keys on this layer (next to A and ;) use so called “Hold/Tap” function.
This means that they will work normally when you hold this key for a longer period (more than 180 milliseconds).
However, when you short-press (“tap”) the key, it will work as a different key.
The left Shift will work as Escape when tapped, while the right Shift will work as ' when tapped.
Note that ' works the same as on regular keyboard, so when you hold the left Shift and then tap the right one,
this will input " (which is Shift + ').
Hold/Tap function is very useful for modifier keys like
Shift, because you never need to short-press them alone, without pressing any other keys.
Thumb cluster
The modifier keys Gui and Alt are located under your thumb along with Space and Enter (which also change layers, see below).
Two keys in the thumb claster are left empty, so feel free to assign them whatever functions you want!
Switching layers
The main keys that you won’t find on the default layer are the function keys (F1-F12), Insert/Home/PageUp/…, arrow keys and brackets. To access these keys you must switch the current layer to a different one.
To do this use Space/Enter. These keys are configured in “Hold/Tap” mode — they act normally when tapped, but when held for longer
they will switch to a different layer. Holding Space will switch to layer 1, while holding Enter will switch to layer 2.
Additionally, when you hold both Space and Enter you will switch to layer 3. This works because the “hold” functions of these keys
are configured differently on layers 1 and 2. You can check this yourself in the configurator.
Holding Space/Enter
While Hold/Tap allows for reusing a single key for multiple functions, it has one downside — you cannot hold this key to keep inserting
characters of the “tap” function (e.g. when holding “normal” Space it will keep inserting more spaces).
To remedy this Space/Enter on the default layer have “Hold/Tap overrides” that set “Tap-hold interval” to 140 ms, which is less
then the 180 ms “timeout”. With this setting, when you press Space quickly 2 times and then hold the second press it will not trigger
the “hold” function but will act as if you held “normal” Space.
This is not ideal solution, as you must get the timing right, but is enough for most cases. The timing has been set to these values based on our tests, but you may experiment with different values.
Layer 1
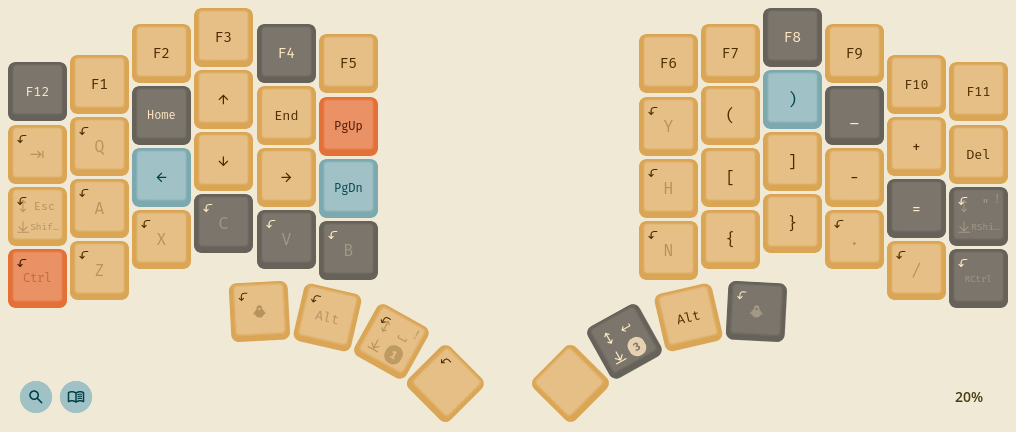
This layer contains most of the “normal” keys that are missing on layer 0.
F-keys are located on top, with F1-F10 located above corresponding number keys, F11 to the right and F12 wrapping to the beginning.
The left half of the keyboard is dedicated to movement keys. Arrows are located over ESDF keys (as WSAD is feels less ergonomic, but you may want to change that) and Home/End/PgUp/PgDown are nearby.
The right half contains all the bracket types, -, = (with their shifted versions _ and + located above) and
the Delete key located in the position of Backspace from layer 0.
Right Alt
Right Alt (also known as AltGr or Alt Graph) is mostly used on keyboards to input special language-specific
characters with combination with normal letters.
However, it won’t work as “normal” Alt modifier key (Left Alt must be used).
This is normally fine, but when you are on layer 1 you are currently holding the Space key with your left thumb.
It would be very difficult to press Left Alt (e.g. to use Alt + Left) with your thumb at the same time.
For this reason the Right Alt from layer 0 get’s replaced with Left Alt when you are on layer 1.
So to input e.g. Alt + Left you would hold Space with left thumb, then hold the Alt on the right with your
right thumb and finally press Left with your left finger.
Layer 2
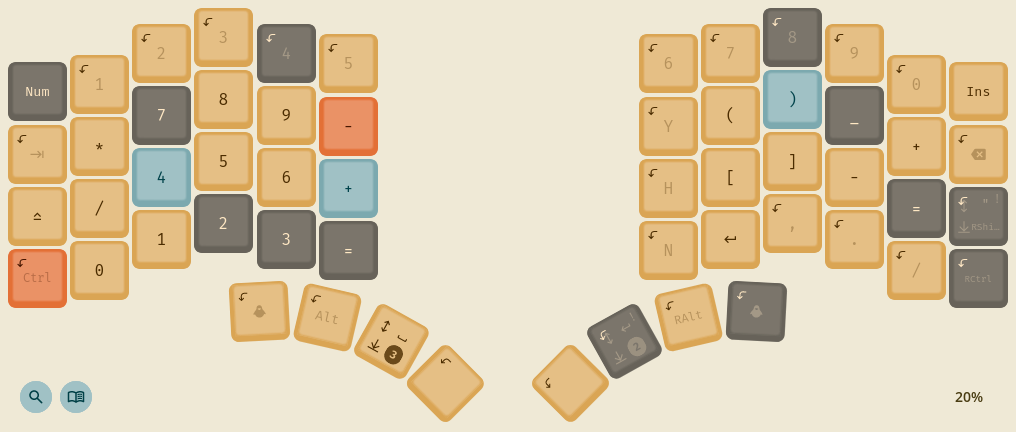
This layer is configured as the “numpad layer”.
On the left it contains numbers organised in the same shape as on regular numpad, with some mathematical symbols around it. On the right half you will see brackets and symbols from the layer 1 in case they are needed.
Curly braces are not present. Instead there is an Enter key, as you are currently holding the Enter from layer 0
with your right thumb. This way you can use Enter without leaving layer 2.
Layer 2 also contains some miscellaneous keys: NumLock and Insert in top-left/right corners and CapsLock on the left.
These keys are rarely used but they are there in case you need them.
Layer 3
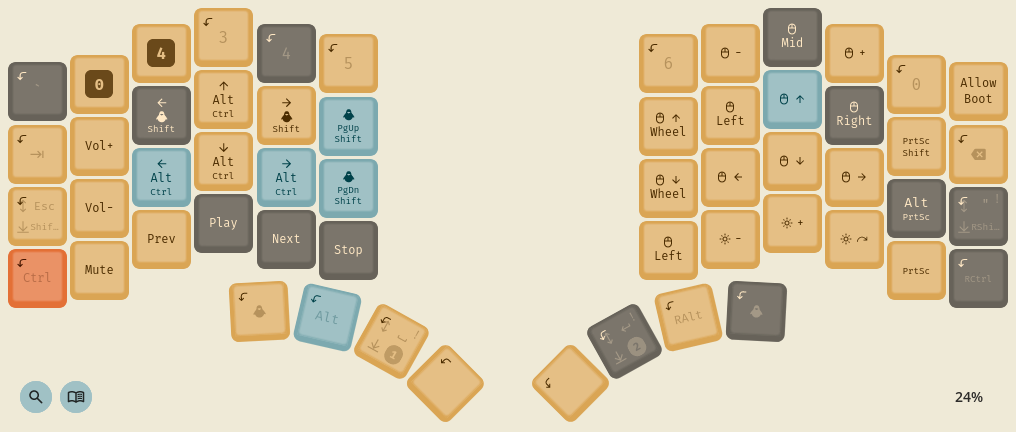
This layer is mostly composed from “special” keys that are not available on normal keyboards and have some interesting functionality. This layer is probably the first one that you might want to reorganise to your liking.
Media control
Various keys for controlling media playback are located on the left half of this layer.
This includes volume control (Volume Up, Volume Down, Mute) and current track playback
(Previous Track, Next Track, Play, Stop).
Special combos
Left half of this layer also contains some key “combos” that can serve as an example for your configuration.
These keys (e.g. Ctrl + Alt + Left) can be useful to e.g. switch between “virtual desktops”/”workspaces” in some
operating systems — tune them to your needs or remove them completely.
Another approach to such keyboard shortcuts could be to configure a combo key consisting of multiple modifier keys,
e.g Ctrl + Alt.
You could even create a key that presses 4 modifiers at the same time (
Ctrl + Shift + Alt + Gui). Such combo is basically impossible to press on normal keyboard, so you can define system-wide keyboard shortcuts that require all of these keys and they will never interfere with keyboard shortcuts defined in any application! This is sometimes referred to as the “Hyper” key.
There are also some PrintScreen combos on the right side.
This may or may not be useful depending on your system configuration.
Mouse emulation
Our keyboard can also act as an USB mouse. Right half of layer 3 contains multiple keys that allow you to control the mouse cursor by moving it, clicking and scrolling mouse wheel.
This is of course not as good as a normal mouse but may be useful if you need to just click with your mouse to focus some window and you don’t want to move your hand from the keyboard to the mouse and back. Feel free to remove these keys if you don’t find it useful!
Mouse emulation parameters can be configured in the “Mouse” tab in the layout configurator.
Allow boot
This is a special key that interacts directly with our keyboard firmware. It must be pressed whenever you want to flash new firmware onto the keyboard. This is a security feature not to accept any firmware upgrades that you are not aware of.
You can press this key only once and it will allow firmware upgrades until the keyboard is powered off or reset.
For more information see AllowBootloader.
Changing the default layer
Up until now we used the term “default layer” and “layer 0” interchangeably but there is a subtle difference.
The “default layer” is the layer that is used when you press keys while you are not holding any layer switching keys (keys with “Layer X” function). When the keyboard powers on the “default layer” is set to layer 0, so layer 0 is the default layer. But the default layer can be changed later using some special keys. Changing the default layer can be useful to create some special modes more suited for some tasks.
On layer 3 you can find keys to set the default layer to either 0 or 4. These keys are located on the top of left half. Pressing the key once changes the default layer until the other key is pressed.
Layer 4
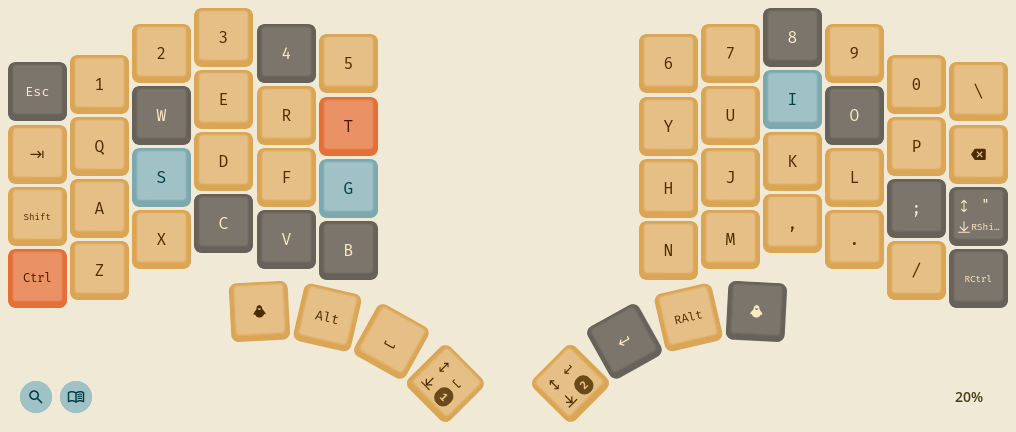
This layer is an alternative “default layer” to the layer 0.
Layer 4 is intended to work as a “Gaming mode”. It replaces all the Hold/Tap keys with normal ones,
moving Escape to the top-left corner and the layer switching keys to the free thumb keys.
This way it should be easier to use the keyboard in games, where you often need to hold Space/Enter
or may e.g. need to tap the Shift key.
To switch back to using layer 0 as the default layer, press both layer-switching keys (they are now in different positions than on layer 0!) to switch to layer 3 and then press the key that switches default layer to layer 0.
You can always unplug your keyboard and plug it again to reset to layer 0 if you have problems finding the correct key :) This may be a confusing at the beginning but you will quickly get used to it.
LEDs
Our keyboard supports RGB LED lighting under each key which can be controlled on per-key basis. The details of how to configure LEDs using the configurator are described in LEDs configuration, here we will briefly describe how the LEDs are set up in the default layout.
There are 3 separate LED configurations that you can switch between using the Led Cycle Up button on layer 3.
You can also change overall brightness with Led Brightness Up/Led Brightness Down keys.
Configuration 0
This is the default and it is there to make it easier to learn the keyboard when using it for the first time. It is not meant to be the most visually appealing, but rather practical, while also demonstrating configuration possibilities.
- It will keep pulsing with yellow light when not pressing any keys.
- After you pressed the
Allow Bootloaderkey the pulsing will change color to cyan. This way you will know if the keyboard is ready for flashing new firmware. - Whenever you enter layer 1, 2 or 3, all keys that are not
Transparent(i.e. are explicitly configured on these layers) will be show with green, blue and purple color respectively. - Whenever you press any key, it will pulse with red color once for a short time.
- When the
Caps Lockis enabled all keys will be white, regardless of any other conditions.
Configuration 1
This configuration is a less visually noisy variant of configuration 0. It still shows keys that are explicitly configured on layers different than 0 but uses more toned colors.
Configuration 2
This is just an example of continuous rainbow gradient.