Keys configuration
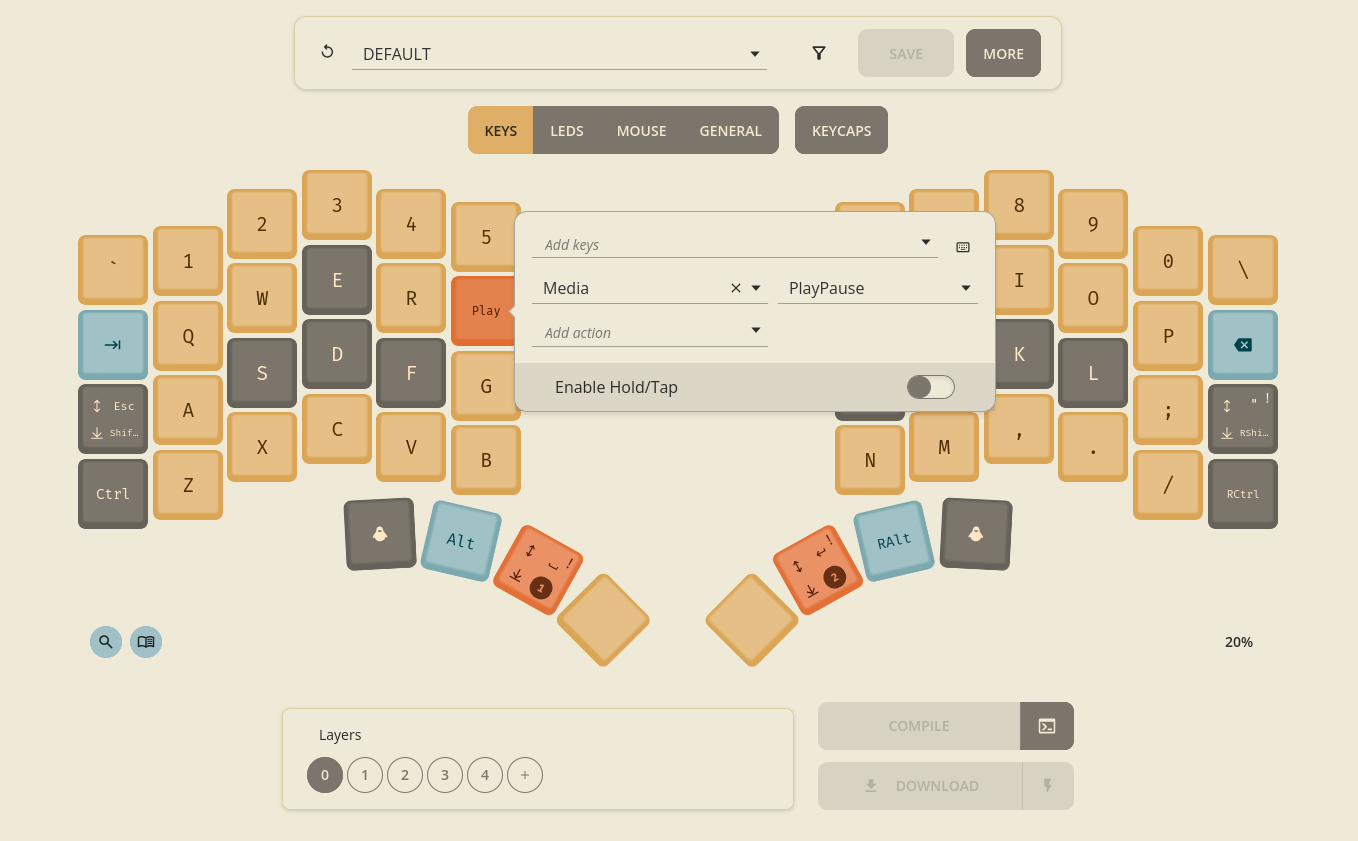
Keyboard keys functionality can be configured in the KEYS view.
Each key is configured separately. Key functionality defined by so called “actions”
and these actions are then organised into “layers”.

Layers
Before we discuss available actions it is important to introduce the concept of keyboard layers. Layers are important because they allow you to have access to more keys (or “functions”) than you have physical keys on the keyboard. You can think of a “layer” as a separate set of keys. When you change the current layer, the functionality of all (or only some) keys changes. There are special key “actions” that allow to switch the current layer.
This is similar to how Fn key behaves on some keyboards — when you hold it and press some other
keys, then these keys have different functions than they would normally have. You could even say
that Shift key works as a separate layer — whenever you hold it all letter keys “change” to
uppercase letters and e.g. number keys become special characters (1 -> !, 2 ->@, etc.).
Configured layers can be found at the bottom of the KEYS view and are denoted by consecutive numbers,
starting from layer 0 which is the initial “default layer” — unless you use some special keys to
change layers, the keyboard will use actions from the default layer.
Actions
In the middle of the KEYS view you will see all the keys available on your keyboard.
When you click on any key a popup menu will appear. It this menu you can configure the “actions”
assigned to this key.
Key actions
The first list configures “key actions”. Here you will find all the regular keyboard keys including
letters (A - Z), numbers (Kb1 - Kb0, top row in QWERTY), special keys (Enter, Tab, etc.),
function keys (e.g. F12), keypad keys (e.g. Kp1) and modifiers (e.g. LCtrl/RCtrl for Left/Right
Control Key).
Special actions
You can add non-key actions in the second and following lists.
Transparent
Key configured with this action will function as if it was pressed on the default layer, not on
the current layer. For example, let’s assume you have Q assigned to one of the keys on the layer 0
(default layer). If you set Transparent for this key on layer 1 then, when you enter layer 1,
Q will still be available in this position.
When you create a new layer all keys are initially set to Transparent.
Layer
This action temporarily switches the current layer to the given layer when holding the key.
For example, when you press and hold a key configured as Layer(2), all other keys will change
their function according to the configuration of layer 2. The moment you stop holding this key,
all keys will go back to the default layer.
This is similar to how the Shift key works — when you hold it the number keys become special
characters (1 -> !, 2 ->@, etc.).
Default Layer
This action is similar to Layer but changes the current default layer. The default layer is initially
the layer 0 but with this action you can change it to another layer. This new default layer won’t change
when you stop pressing the DefaultLayer key — you must use another key with action DefaultLayer(0)
to set the default layer back to layer 0.
For example, you could have QWERTY layout configured on layer 0 and Dworak layout on layer 5.
Then you can set DefaultLayer(5) on a key on layer 0 and DefaultLayer(0) on the same key on layer 5.
This way you can toggle between layouts by pressing a single key.
Led actions
Led Cycle changes current LED configuration and Led Brightness increase/decrease LEDs brightness.
See LEDs configuration for more information.
Mouse actions
These actions (Mouse Move/Mouse Click/Mouse Sensitivity) allow to emulate an USB mouse using keyboard
keys. See Mouse emulation for more information.
Media
This action allows to configure keys that control music playback — play, pause, next track, etc.
Firmware
These are special actions related to how the keyboard firmware operates.
The AllowBootloader action is very important, the other actions won’t be needed for most users.
AllowBootloader
Key with AllowBootloader must always be pressed before you can flash new keyboard firmware — whenever
keyboard flashing fails, make sure that you have pressed this key and try flashing again.
You can press this key only once and it will allow firmware upgrades until the keyboard is powered off or reset.
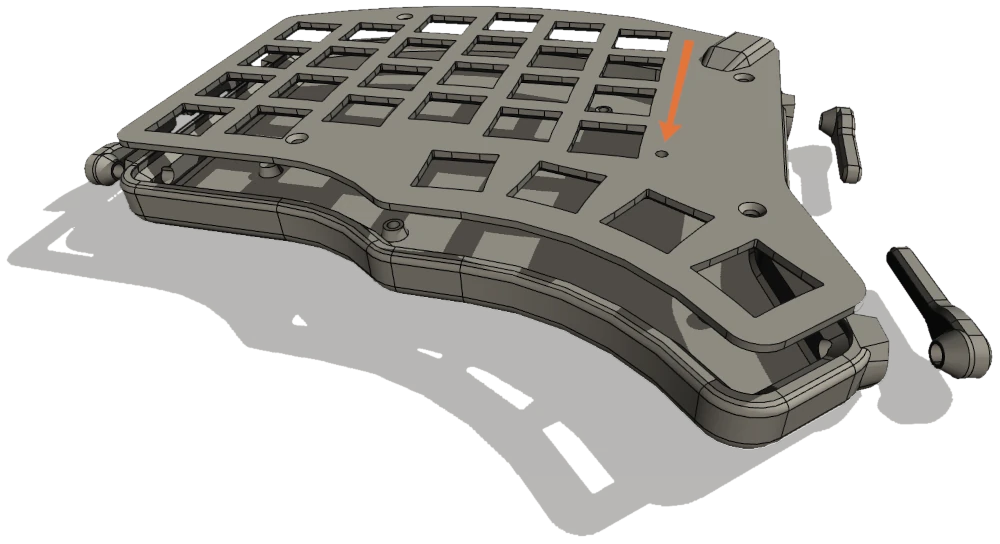
Without this key it is not possible to flash the keyboard when it is in normal operation state — this is a security feature that prevents your configuration from being modified when you don’t want it. In case you loaded firmware without this key configured or for some other reason the keyboard cannot switch to bootloader you can force it manually. To do this take a toothpick or similar item and use it to press a hidden button (located inside keyboard case) for 3 seconds or more. The location of the button has been shown in the image below:

Hold/Tap
Hold/Tap is a special kind of key configuration that allows to use different action depending on how we use the key.
Some keys are almost only used to just press them for a short time and then release (“Tap”), e.g. all the letter keys
(A, B, C) — we rarely need to hold them (it would keep inserting multiple copies of given character).
On the other hand some are almost only used as “modifiers” by pressing them for a longer period of time and then
pressing (“tapping”) some other key, e.g. Ctrl.
We can use this fact to squeeze more functionality into a single key using the Hold/Tap action.
When you enable Hold/Tap for a given key you will be able to configure two different sets of actions.
One that activates when a key is tapped (pressed for a short time) and another that activates when the key is held
for a longer period of time.
For example, you can configure a key to act as Escape when tapped but as Shift when you hold it.
This way you save a key that can be used for something else. If you find yourself sometimes still needing to hold
Escape for longer or tap Shift you can e.g. add this keys without Hold/Tap on some other layer.
Another great candidate for keys needed only when held are the keys with Layer action.
Timing
Hold/Tap functionality depends on correctly configured timeout value.
When the key is released before the timeout then the Tap action is used, otherwise the Hold action is used.
The default value for the timeout can be configured globally in the GENERAL view
but you can also set it individually for each key using Hold/Tap overrides.
Timeout behaviour
Config allows to modify the default behaviour of Hold/Tap. Available options are:
-
Default— only timeout is used to determine whether to useHoldorTapaction. -
HoldOnOtherKeyPress— when another key is pressed when this key is being held thenHoldis used, even if timeout has not been reached yet. This is useful if theTapaction is not used in quick successions with other keys. Using this setting withTapbeing e.g. a letter may cause accidental falseTaps when typing quickly. -
PermissiveHold— similar toHoldOnOtherKeyPressbutHoldis activated when there is a press and release of another key when holding this key. It may be useful for fast typists.
Tap-hold interval
If you find yourself sometimes actually needing to hold the Tap action, but you still want to use Hold/Tap,
then there is another setting called Tap-hold interval that may be useful. It is enabled when set to non-zero value.
When you press an release this key in such a way that Tap action is triggered, then press the same key again in
less then Tap-hold interval milliseconds and hold it, then the Tap action will be used while holding.
For example, when you have A for Tap action and Ctrl for Hold action, then if you quickly press, release
and then hold this key, the computer will repeat A as if you held a key that only has A action without Hold/Tap.